 |
| Extend your adjustable height tent poles. Insert the tent pole tips into the corner grommets. |
 |
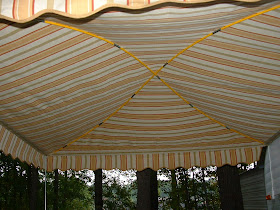
| The shock poles are shown in the correct position on the underside of the awning. |
 |
| This image shows the incorrect shock pole positioning. Slide the poles until they cross in the precise sweet spot arching the awning fabric upward. |
 |
| Tie the shock poles together with the braid strapto keep them from slipping out of position. |
 |
| For extra strength a Velcro Strap is a good idea |
 |
| Over the years, I decided that the center grommet was not necessary. The largest arched awning I make now is 8'x8'. |
 |
| Side view of an arched vintage trailer awning with shock poles for lift |
 |
| The pockets are hidden in the facings on the underside of the awning, so the awning can be used as a traditional flat awning if so desired. |
 |
| There are several ways to take the arched awning down. The shock poles are under tension, so be careful when swinging them downward to remove from the pockets. |
https://facebook.com/vintagetrailerawnings
